24 June 2011

Sweet, Adaptable Curry


This is a dish I play with and update fairly often. At Thai restaurants, I often order Massaman Curry. This is an ode to (but certainly not a duplicate of) this delicious, sweet curry.

Since I do not actually have a recipe (or even any idea of the amounts I use), this is more of a "how to" on how I prepare curry.

First, I always saute a large sweet onion and any other hard vegetables I want to include. My recent favorite has been sweet potatoes. Once the veggies are softened, but not totally cooked through, I add 3-4 tablespoons curry powder to the dish and allow it to cook into a roux. Once the roux is well developed (the curry powder should be fully incorporated with the fat in the pan), I turn down the heat and add coconut milk just a few tablespoons at a time. I don't know that there is a reason why I do this, but I like to add the thick fatty part of the coconut milk before I add the thinner liquid. I like my curry exceptionally creamy and coconut-y, so I use a full can of coconut milk, but that is certainly not necessary. Finally, I allow the curry to very gently simmer for another 30min to an 1hr so the flavors have the opportunity to fully marry. If the curry gets too thick in the process, I add a little broth to thin it out.

The fun part about making this curry is that it is really easy to change up. You can add any variety of vegetables and proteins. I just recently tried it out with tempeh as the protein and I added a tablespoon of sugar to make it even sweeter (maybe too sweet!). I also like to add veggies with some crunch, such as carrots (added toward the end so they don't soften up), bamboo shoots, and water chestnuts. Finally, curry loves added spice, so I often add a pinch of cinnamon, allspice, and/or cardamom. No matter what I decide to add, I always allow it to cook long enough so no one flavor sticks out too much. I also like to serve the curry with fluffy brown jasmine rice and some sort of leafy green.

Curry powder being added to sauteed onion and sweet potato

Curry as a well-developed roux

The addition of the coconut milk

02 August 2010

Spinach, Ham, and Brown Rice Casserole


This recipe has become a favorite amongst the Bermans. I served it at Mother's Day Brunch and we've had it for dinner several times in the last few months (versatile, no??). It's nice, because you can make the rice ahead of time and the then just throw everything together as you go. The recipe is an adaptation of Martha Stewart's recipe from Everyday Food. Sorry, I can't remember the month and I have no idea where my copy went. Besides, you know I made my own little changes as I went, so here's an idea of what I did.

2 pkg frozen spinach
2 eggs
1/2 c. milk
sea salt
fresh ground pepper
fresh grated nutmeg (just a pinch)
2-3 c. cooked brown rice
1 c. cheese (I recommend sharp cheddar, brie, or gruyere) + 1/4 c. for top, cubed or grated
2 lg Vidalia onions, cut in bite-size slivers
1/2 c. dry white wine
1 c. ham, finely chopped


Preheat over to 375deg.

Thaw the spinach and drain. Beat eggs with milk and seasoning. Add spinach, cheese, and rice; mix. Notice in the picture above, I did not beat the eggs first. I wasn't the end of the world -- it would just be easier to keep the texture consistent if the eggs are beaten before mixing. Also, I used brie as my cheese, which made for a great flavor, but was harder to cut and mix in that sharp cheddar would be.

Saute onions in butter and oil (I saute with 2tbsp olive oil + 1tbsp butter for flavor). Once translucent to slightly brown, add 1/2 c. white wine and cook about 5min, allowing alcohol to cook off and wine to reduce. Add ham, heat through and crisp up a bit.

Mix onions and ham with spinach mixture. Pour into greased casserole dish (I can't specify size. I don't measure, so I'm never sure what size I'll need until it's all assembled. 9"x13" is a safe bet), top with additional cheese and bake for ~30min. Serve hot, while cheese is still perfectly melted.

I didn't manage to get a picture of the final product before it was devoured, but I think that's just a testament to how delicious this recipe is!

Browning slivered onions

The spinach mixture, fully mixed

06 February 2010

A Lighter Chicken Parmesan

Perhaps you're staring to notice a theme. Yes, I'm really into parmesan lately! A couple weeks ago Josh tried his hand at Chicken Parmesan and it was AMAZING! I admit it, I doubted him. I'm proud to say he proved me wrong, though, and produced quite a delicious meal.

Last night, it was up to me to create a decent meal. We had planned to grill out, but it stormed all day long (there were even tornadoes in the area!). I wanted to throw together something pretty quickly, but keep it on the lighter side. Josh's Chicken Parm came to mind, but I threw a spin of my own on it. Instead of dousing the chicken in sauce and smothering it in cheese (is your mouth watering yet??), I just breaded and baked the chicken and then served it with brown rice and steamed veggies.

To prepare the chicken, I took boneless skinless breasts and rubbed them in nonfat plain yogurt mixed with just a tiny dollop of honey dijon mustard for just a hint of tanginess (Josh and I usually use full-fat sour cream, so this was a nice alternative). Then, I breaded the chicken with a mix of bread crumbs, parmesan, pepper, onion powder, and garlic powder. I used standard crumbs, but I think we'll try whole wheat crumbs next time! I placed the chicken on a slotted roasting pan so the juices would not collect around the breasts. Then, I baked them at 365degrees for about 25minutes. I like my chicken a little better done than most, but I took them out while they were still quite juicy for Josh's sake.

For the rice, I prepared brown rice as directed, but added about 1/2tsp of Better than Bouillon after the rice was finished. This added some nice flavor, just not a lot of extra calories or sodium.

Finally, I served steamed veggies on the side. Archer Farms makes some nice varieties with no additives. For this particular meal, I chose a mix of green beans, wax beans and Parisian carrots.

This is definitely a meal we'll be trying again soon!

Roasted Veggies with Parmesan Couscous

This meal is ridiculously easy to makes.. and such a joy to eat!! The veggies have to roast for abut 40minutes at 425desgrees. That's the hardest part of the meal.. seriously! Josh and I actually planned to have this meal several days before we ended up preparing it, because we kept running into evenings where we just didn't have the time or patience to wait. The final product is defintely worth the wait, though!

I sliced up the veggies into pretty hearty chunks. Depending on the water content of the veggies you use (I used tomatoes, mushrooms, eggplant, and crushed garlic cloves), they shrink quite a bit through the roasting process. I brushed a cookie sheet with oil, arranged the veggies in a single layer, then brushed the veggies as well. I topped everything off with a tiny bit of sea salt and into the oven they went! About 25minutes into the roasted process, I gave everything a good shake to dislodge them from the pan. Other than that, I didn't have to do a thing until they were done!

Also, I made the couscous ahead of time. I know, I know... couscous is a breeze to cook , but -- shh, don't tell! -- we had some leftover from another meal. About 5 minutes before the veggies were finished, I popped the couscous in the microwave with a light drizzle of olive oil and a generous sprinkling of parm. I'm not usually a big proponent of nuking, but the couscous came of light and fluffy!

This meal was delicious, but I think I would add some meat to it the next time I make it. I've also thought about roasting garbanzos with the rest of the veggies. Has anyone tried that??

30 November 2009

Pot Roast Tacos??

I was just flipped through some photos in the album set aside for this blog and I found these. For the life of me, I can't remember what they are. I do, however, remember there was something interesting about them. If I had to take a wild guess, I would say these are pot roast tacos. I believe I took some left over slow-cooked pot roast, added some cumin and chipotle, and called them Tex Mex! Whatever they are, they look darn good and I would be happy to try them again!!


22 November 2009

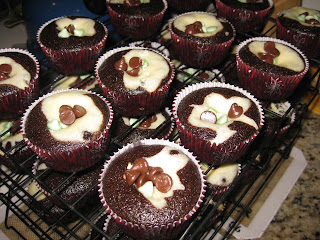
Chocolate Cream Cheese Muffins with Dark Chocolate and Mint Chips

After nearly an 18mo. hiatus, I thought it might be time for a blog post! The holiday season always makes me want to cook, bake, and spruce up the house. Naturally, my nesting instincts are in full swing with Thanksgiving just around the corner.

As a little symbol of my gratitude for such a fantastic job they do, I baked Amelia's teachers some chocolate cream cheese muffins. The recipe I used is a copycat of the ones they serve at Starbucks (although this recipe calls them Black Bottom Cupcakes).

I, of course, added my own touches. To the muffin batter, I added cinnamon. It gives the muffins a little more of a rich Mexican chocolate taste. Also, I used Tollhouse's dark chocolate and mint chips, instead of plain ol' semisweet (or milk) chocolate chips. I must say, they're divine!

Ingredients:
***Filling:***
8 ounces cream cheese, room temp
1/3 cup sugar
1 large egg
dash salt
1 small bag milk chocolate chips

***Cake Batter:***
2/3 cup cocoa
3 cups flour
2 cups sugar
2 teaspoons baking soda
1/2 teaspoon salt
2 cups water
2/3 cup oil
2 tablespoons vinegar
2 teaspoons vanilla
Directions:
Preheat oven to 350 degrees.
Cream the sugar and cream cheese. Mix in the egg and salt. Now stir in chocolate chips. Set the filling aside.
Sift together flour, sugar, cocoa, baking soda, and salt. Next add water, oil, vinegar and vanilla. Mix well.
Fill cupcake liners a little more than half full with chocolate batter. Drop about a generous teaspoon of cream cheese mixture on the top of each in the middle.
Bake in a 350 degree oven for approximately 20 minutes. About 10 minutes into baking, sprinkle some extra chocolate chips on top of each cupcake.
Makes three dozen.

any recipe that starts with this much cocoa must be good!


swirling the dry ingredients


muffins prepped and ready for baking


the final product


this is what dreams are made of :)